事前準備
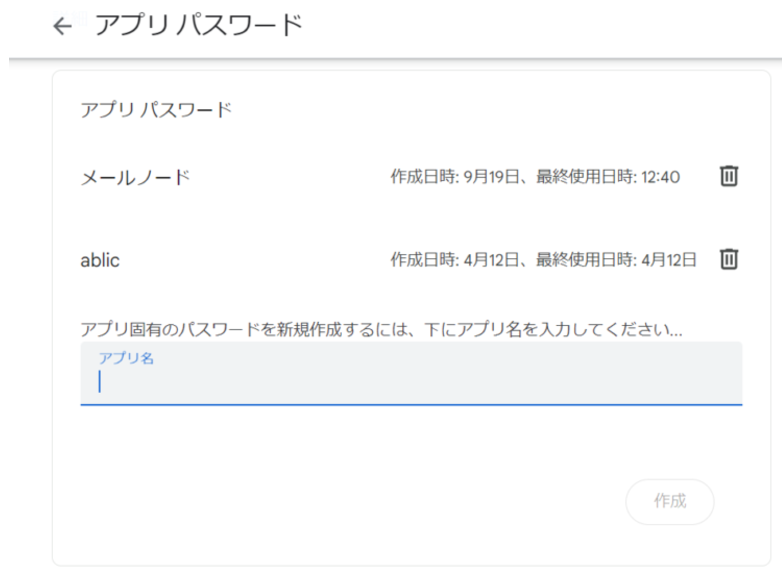
今回は、gmailアドレスを使ってメールを送信していこうと思います。gmailを使用する際は、アプリトークンというものが必要になるため、下記のURLからトークンを発行して控えを取ってください。(発効後決定を押すと二度と見れないため必ず控えてください)
https://myaccount.google.com/apppasswords
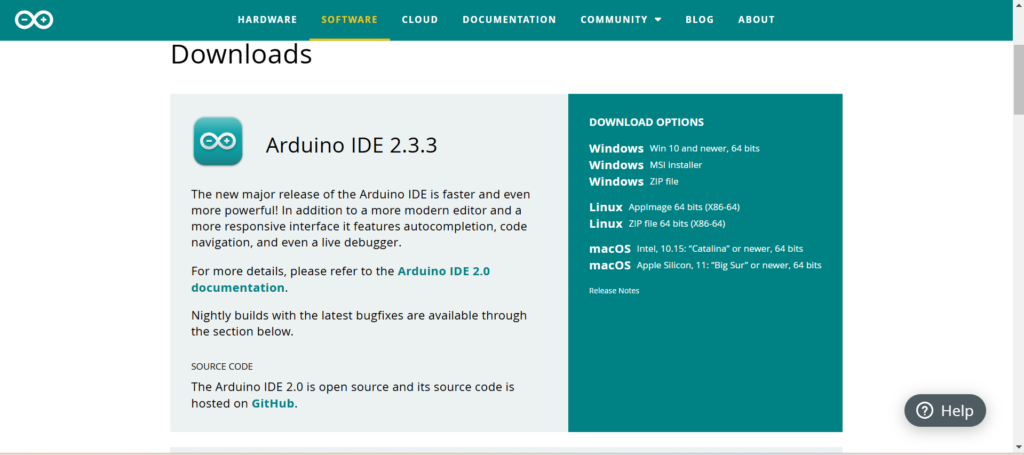
続いて、M5Stackに書き込むアプリのダウンロードしてください(下記URLからダウンロード)
https://www.arduino.cc/en/software
M5Stackの設定(メールを送る)
今回は「GPIOから入力を受けてメールを送る」という設定をするのですが、わかりやすく2段階に分けてプログラムを見ていき最後に統合したいと思います。
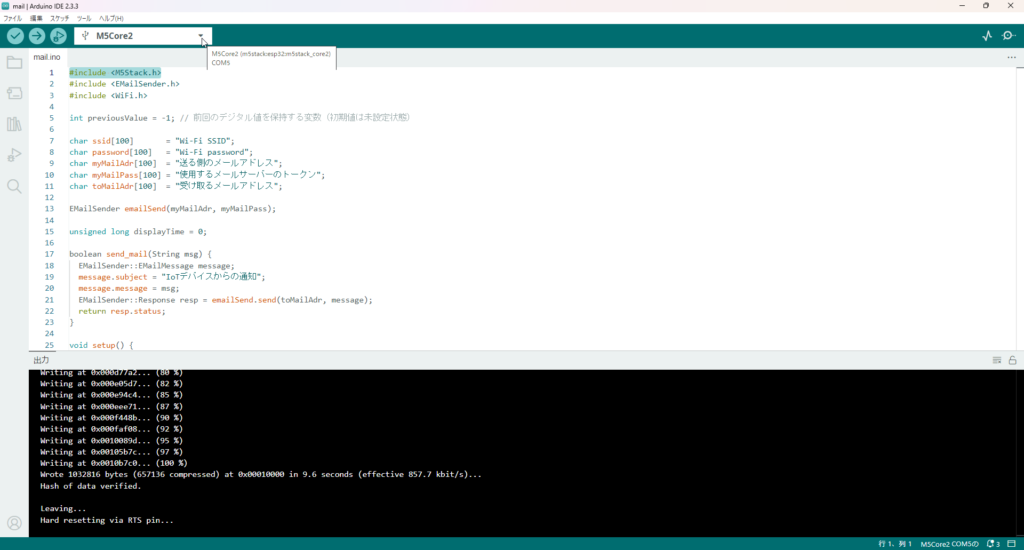
初めにメールを送る設定をしていきます。設定はM5Stack core2は下記コードになります。
#include <M5Stack.h>  //M5Stack core2の際
#include <EMailSender.h>
#include <WiFi.h>

int previousValue = -1; // 前回のデジタル値を保持する変数(初期値は未設定状態)

char ssid[100]       = "Wi-Fi SSID";
char password[100]   = "Wi-Fi password";
char myMailAdr[100]  = "送る側のメールアドレス";
char myMailPass[100] = "使用するメールサーバーのトークン";
char toMailAdr[100]  = "受け取るメールアドレス";

EMailSender emailSend(myMailAdr, myMailPass);

unsigned long displayTime = 0;

boolean send_mail(String msg) {
  EMailSender::EMailMessage message;
  message.subject = "IoTデバイスからの通知";
  message.message = msg;
  EMailSender::Response resp = emailSend.send(toMailAdr, message);
  return resp.status;
}

void setup() {
M5.Power.begin();

  M5.begin();
  M5.Lcd.setTextSize(2);
  M5.Lcd.fillScreen(BLACK);

  M5.Lcd.printf("WIFI START:%s ", ssid);
  WiFi.begin(ssid, password);
  while (WiFi.status() != WL_CONNECTED) {
    delay(500);
    M5.Lcd.print(".");
  }
  M5.Lcd.println(" - READY");
}

void loop() {
  if(M5.BtnA.wasPressed()) {
    int val0 = random(100, 1000);
    M5.Lcd.fillScreen(BLACK);
    M5.Lcd.setTextSize(1); // size
    M5.Lcd.setTextColor(WHITE); // color
    M5.Lcd.setTextDatum(4); // origin
    M5.Lcd.drawNumber(val0, 160, 120, 8); // value, x, y, font
    String msg = "乱数の値は " + String(val0) + " です。";
    send_mail(msg);
    M5.Lcd.setTextSize(2); // size
    M5.Lcd.setTextColor(RED); // color
    M5.Lcd.setCursor(0, 220); // x, y
    M5.Lcd.print("SEND-EMAIL FINISH");
    displayTime = millis();
  }
  if(millis() - displayTime >= 2000) {
    M5.Lcd.fillScreen(BLACK);
  }
  M5.update();
}
M5Stack coreS3は下記コードになります。
#include <M5CoreS3.h>
#include <EMailSender.h>
#include <WiFi.h>
#include <SD.h>

// WiFiおよびメール設定
char ssid[100]       = "Wi-Fi SSID";
char password[100]   = "Wi-Fi password";
char myMailAdr[100]  = "送る側のメールアドレス";
char myMailPass[100] = "使用するメールサーバーのトークン";
char toMailAdr[100]  = "受け取るメールアドレス";

EMailSender emailSend(myMailAdr, myMailPass);

unsigned long displayTime = 0;

// 仮想ボタンの座標とサイズ
int buttonX = 50;  // ボタンの左上X座標
int buttonY = 100; // ボタンの左上Y座標
int buttonW = 220; // ボタンの幅
int buttonH = 60;  // ボタンの高さ

// メール送信関数
boolean send_mail(String msg) {
  EMailSender::EMailMessage message;
  message.subject = "IoTデバイスからの通知";
  message.message = msg;
  EMailSender::Response resp = emailSend.send(toMailAdr, message);
  return resp.status;
}

void setup() {
  M5.begin();
  M5.Lcd.setTextSize(2);
  M5.Lcd.fillScreen(BLACK);

  // WiFi接続
  M5.Lcd.printf("WIFI START: %s\n", ssid);
  WiFi.begin(ssid, password);
  while (WiFi.status() != WL_CONNECTED) {
    delay(500);
    M5.Lcd.print(".");
  }
  M5.Lcd.println(" - READY");
  displayTime = millis();

  // 仮想ボタンを描画
  M5.Lcd.fillRoundRect(buttonX, buttonY, buttonW, buttonH, 10, BLUE); // ボタン背景
  M5.Lcd.setTextColor(WHITE);
  M5.Lcd.setTextDatum(4); // 中心に文字を配置
  M5.Lcd.drawString("SEND EMAIL", buttonX + buttonW / 2, buttonY + buttonH / 2);
}

void loop() {
  M5.update();

  // タッチイベントの検出
  if (M5.Touch.getCount() > 0) { // タッチされたか確認
    auto touchDetail = M5.Touch.getDetail();
    int touchX = touchDetail.x;
    int touchY = touchDetail.y;

    // タッチ位置がボタン内にあるか確認
    if (touchX > buttonX && touchX < buttonX + buttonW &&
        touchY > buttonY && touchY < buttonY + buttonH) {

      // ボタンが押されたときの動作
      int val0 = random(100, 1000);
      M5.Lcd.fillScreen(BLACK); // 画面をリセット
      M5.Lcd.setTextSize(1);
      M5.Lcd.setTextColor(WHITE);
      M5.Lcd.setTextDatum(4);
      M5.Lcd.drawNumber(val0, 160, 120, 8);

      String msg = "乱数の値は " + String(val0) + " です。";
      if (send_mail(msg)) {
        M5.Lcd.setTextSize(2);
        M5.Lcd.setTextColor(GREEN);
        M5.Lcd.setCursor(0, 220);
        M5.Lcd.print("SEND-EMAIL SUCCESS");
      } else {
        M5.Lcd.setTextSize(2);
        M5.Lcd.setTextColor(RED);
        M5.Lcd.setCursor(0, 220);
        M5.Lcd.print("SEND-EMAIL FAILED");
      }

      displayTime = millis(); // タイムスタンプ更新
    }
  }

  // 一定時間後に画面をリセット
  if (millis() - displayTime >= 2000) {
    M5.Lcd.fillScreen(BLACK);

    // 仮想ボタンを再描画
    M5.Lcd.fillRoundRect(buttonX, buttonY, buttonW, buttonH, 10, BLUE);
    M5.Lcd.setTextColor(WHITE);
    M5.Lcd.setTextDatum(4);
    M5.Lcd.drawString("SEND EMAIL", buttonX + buttonW / 2, buttonY + buttonH / 2);
  }
}
Wi-Fiとメール欄を埋めてもらい、流し込みます。
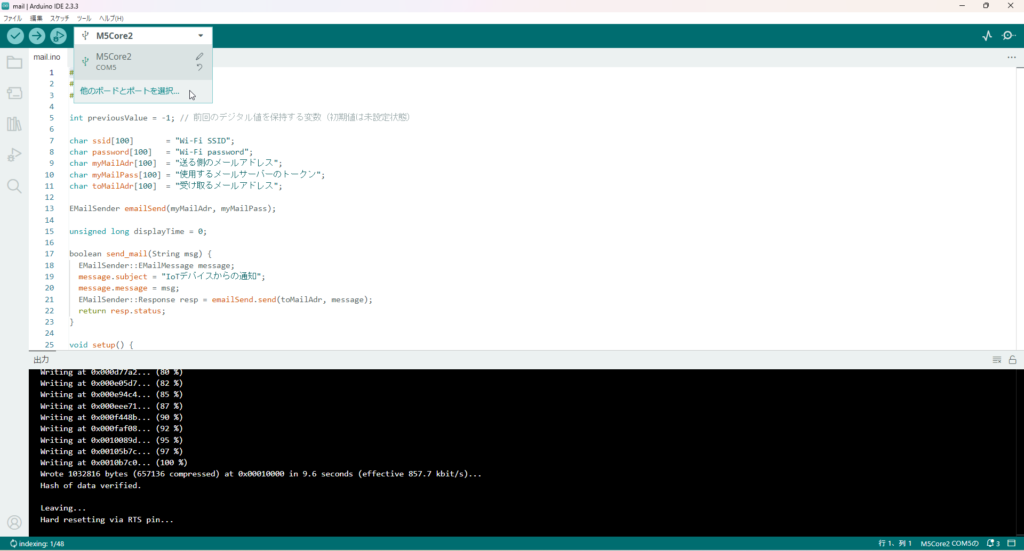
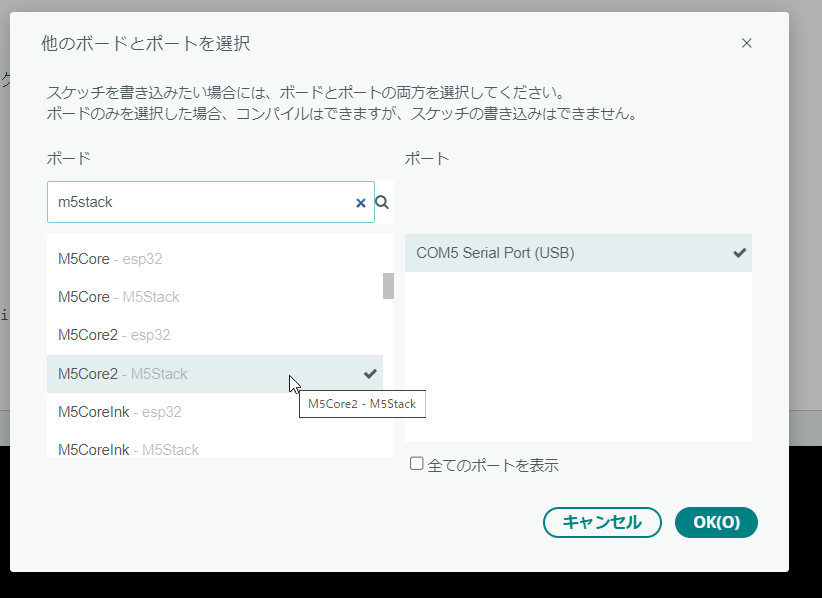
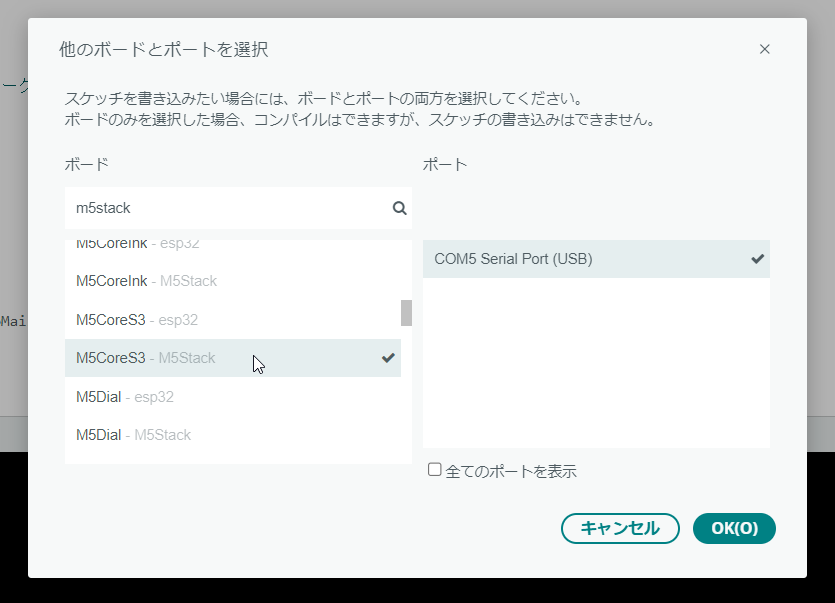
流し込む際、core2とcoreS3で設定が違います。上のUSB接続を選び、他のボードとポートを選択をクリックします。
検索で「M5Stack」と検索し、M5SCore2 – M5Stack、core S3の場合はM5CoreS3 – M5Stackを選びます。
これで、書き込みをします。エラーが出た場合は、しっかりUSB接続されたデバイスを選択できているか、core2とcoreS3を間違えていないかを確認してください。
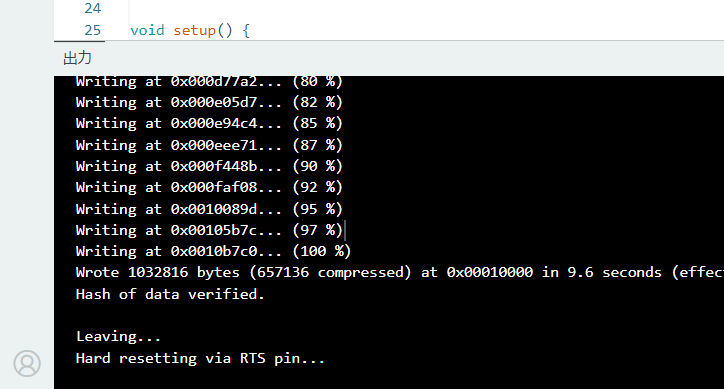
この表記が出ましたら書き込み完了です。
デバイスを確認します。Wi-Fiの接続が完了するとBlack画面になりますので、core2の場合は下の左ボタンを押すと数字が出てきます。coreS3の場合は画面をタッチすると数字が出ます。
数字が出たらメールを確認してください。メールが送られてきていれば成功です。
M5Stackの設定(GPIO入力)
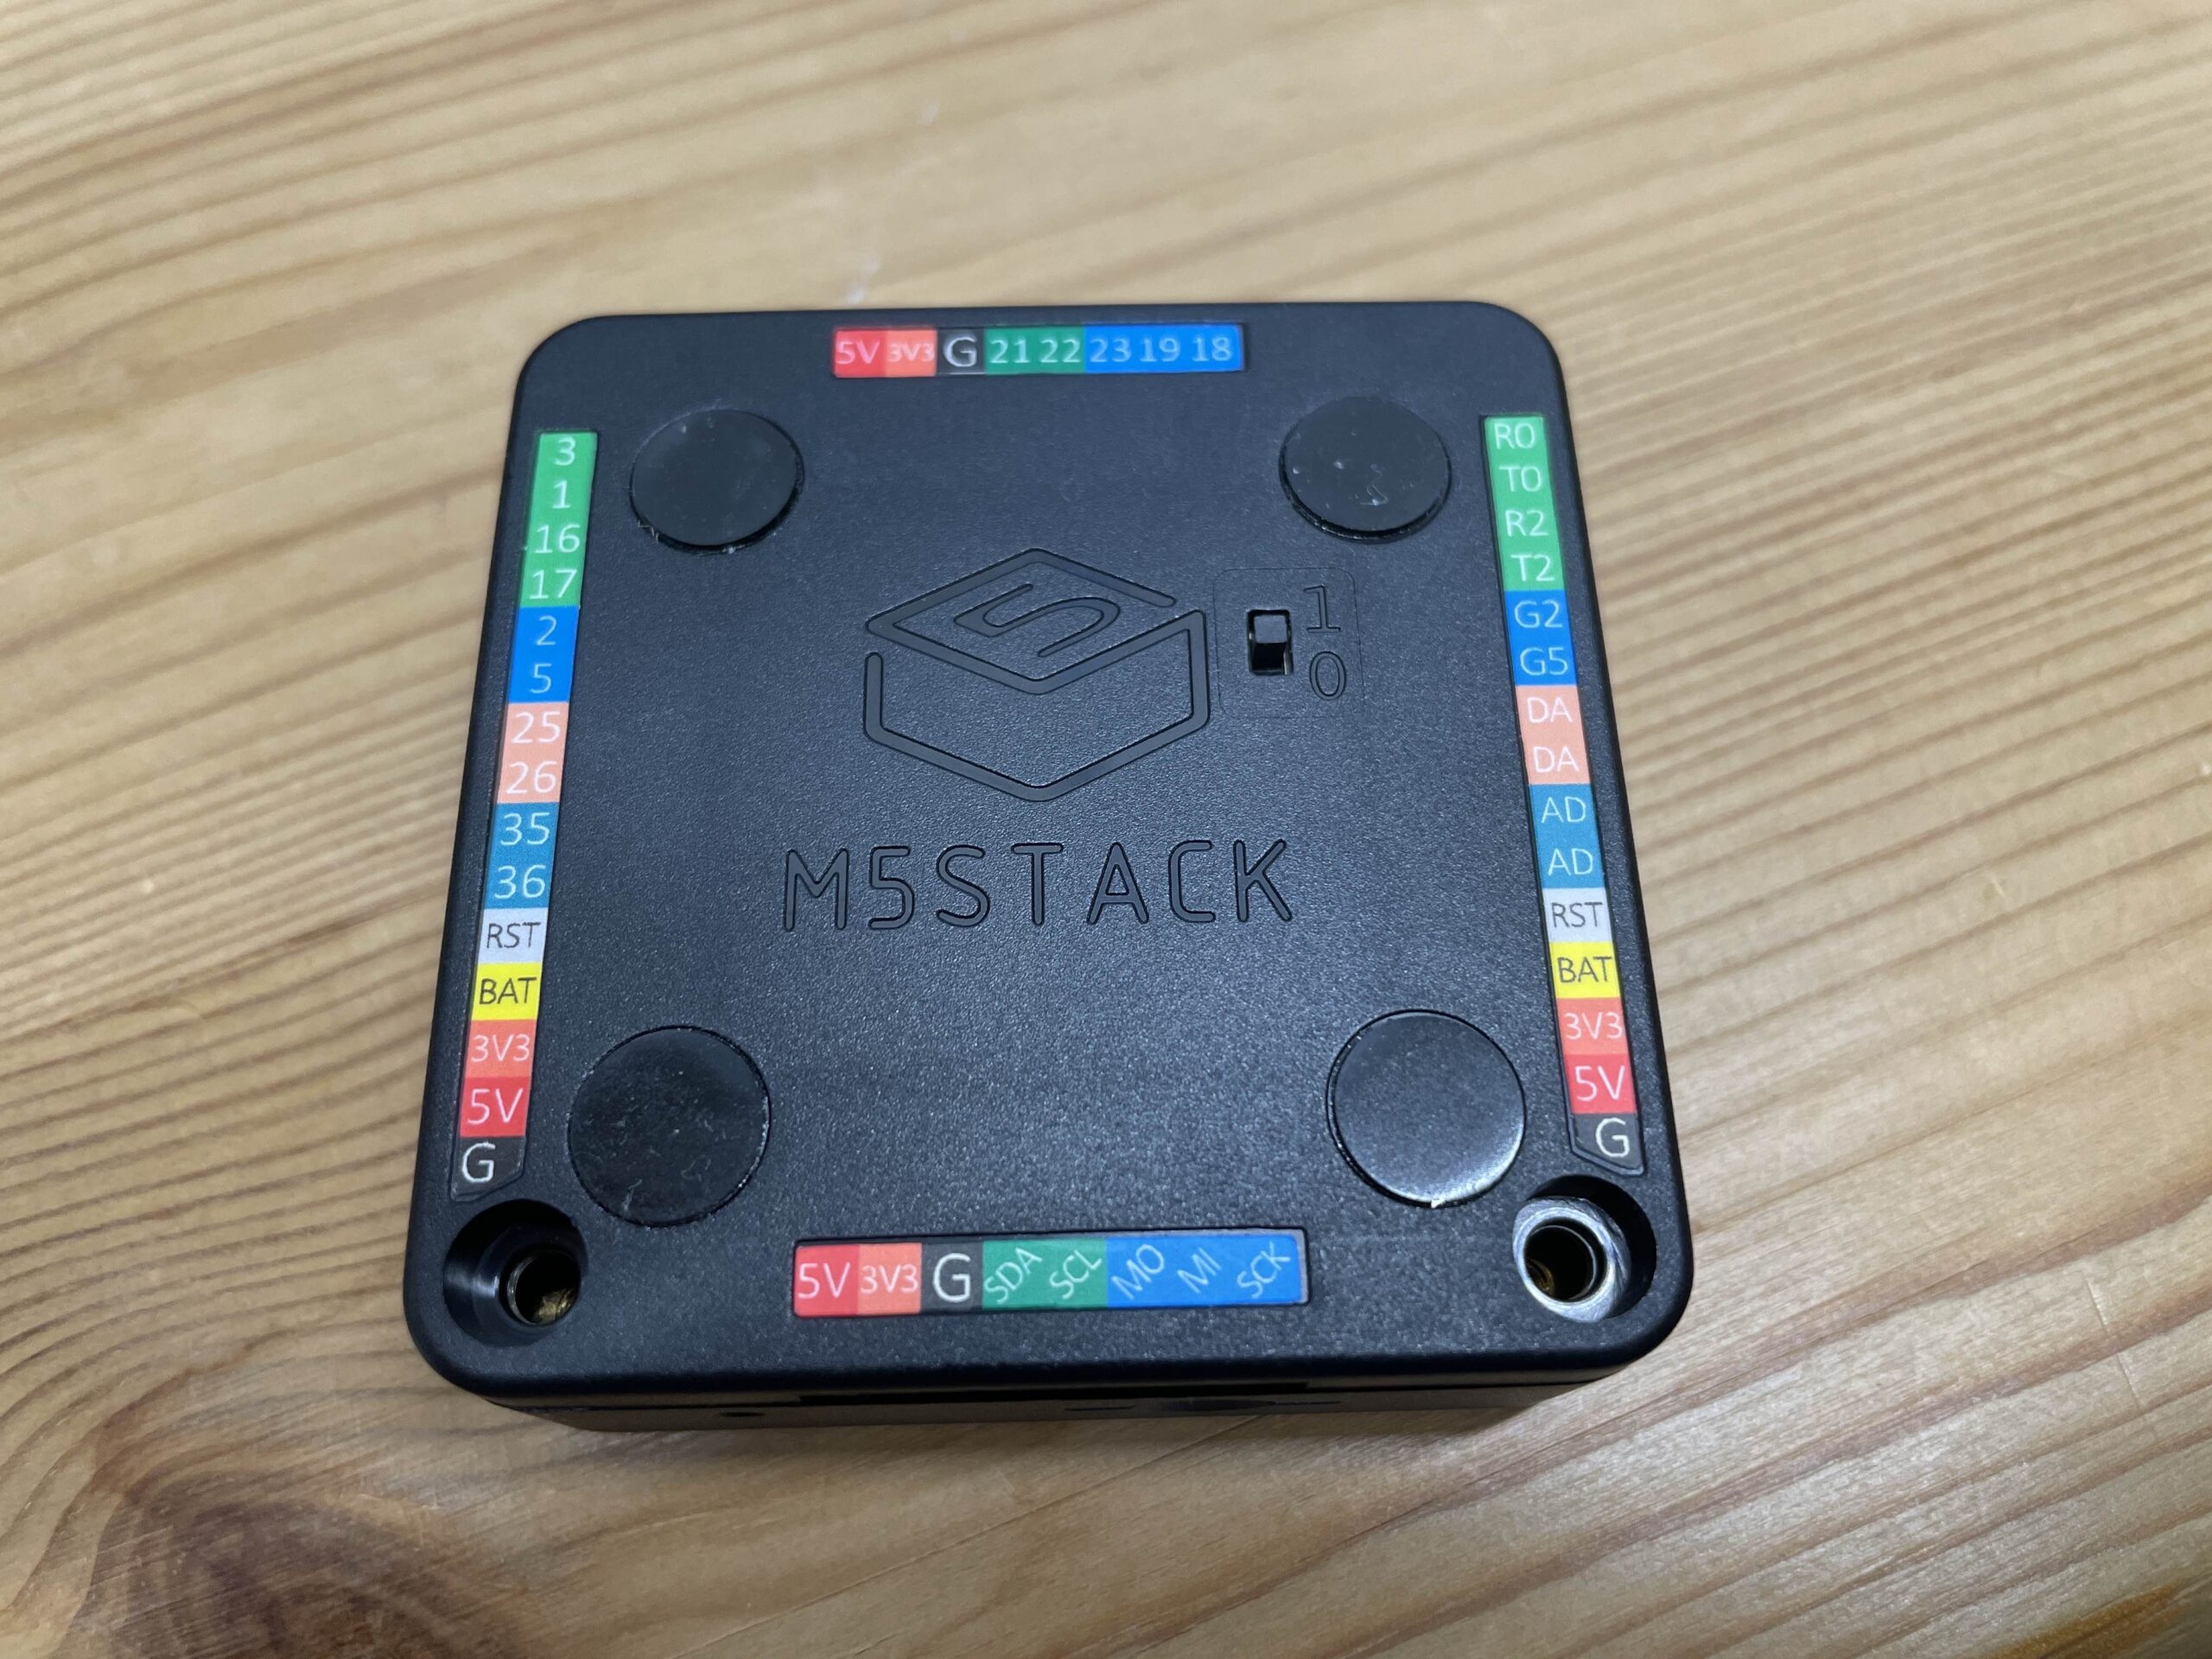
次にGPIOを設定します。GPIOはM5Stackの種類によっていろいろ変わってきます。
今回使うcore2、coreS3は背面に書いてある番号がそのままプログラムに使えるためわかりやすいと思います。
まずは、配線をG(GND)と22番に繋ぎます。
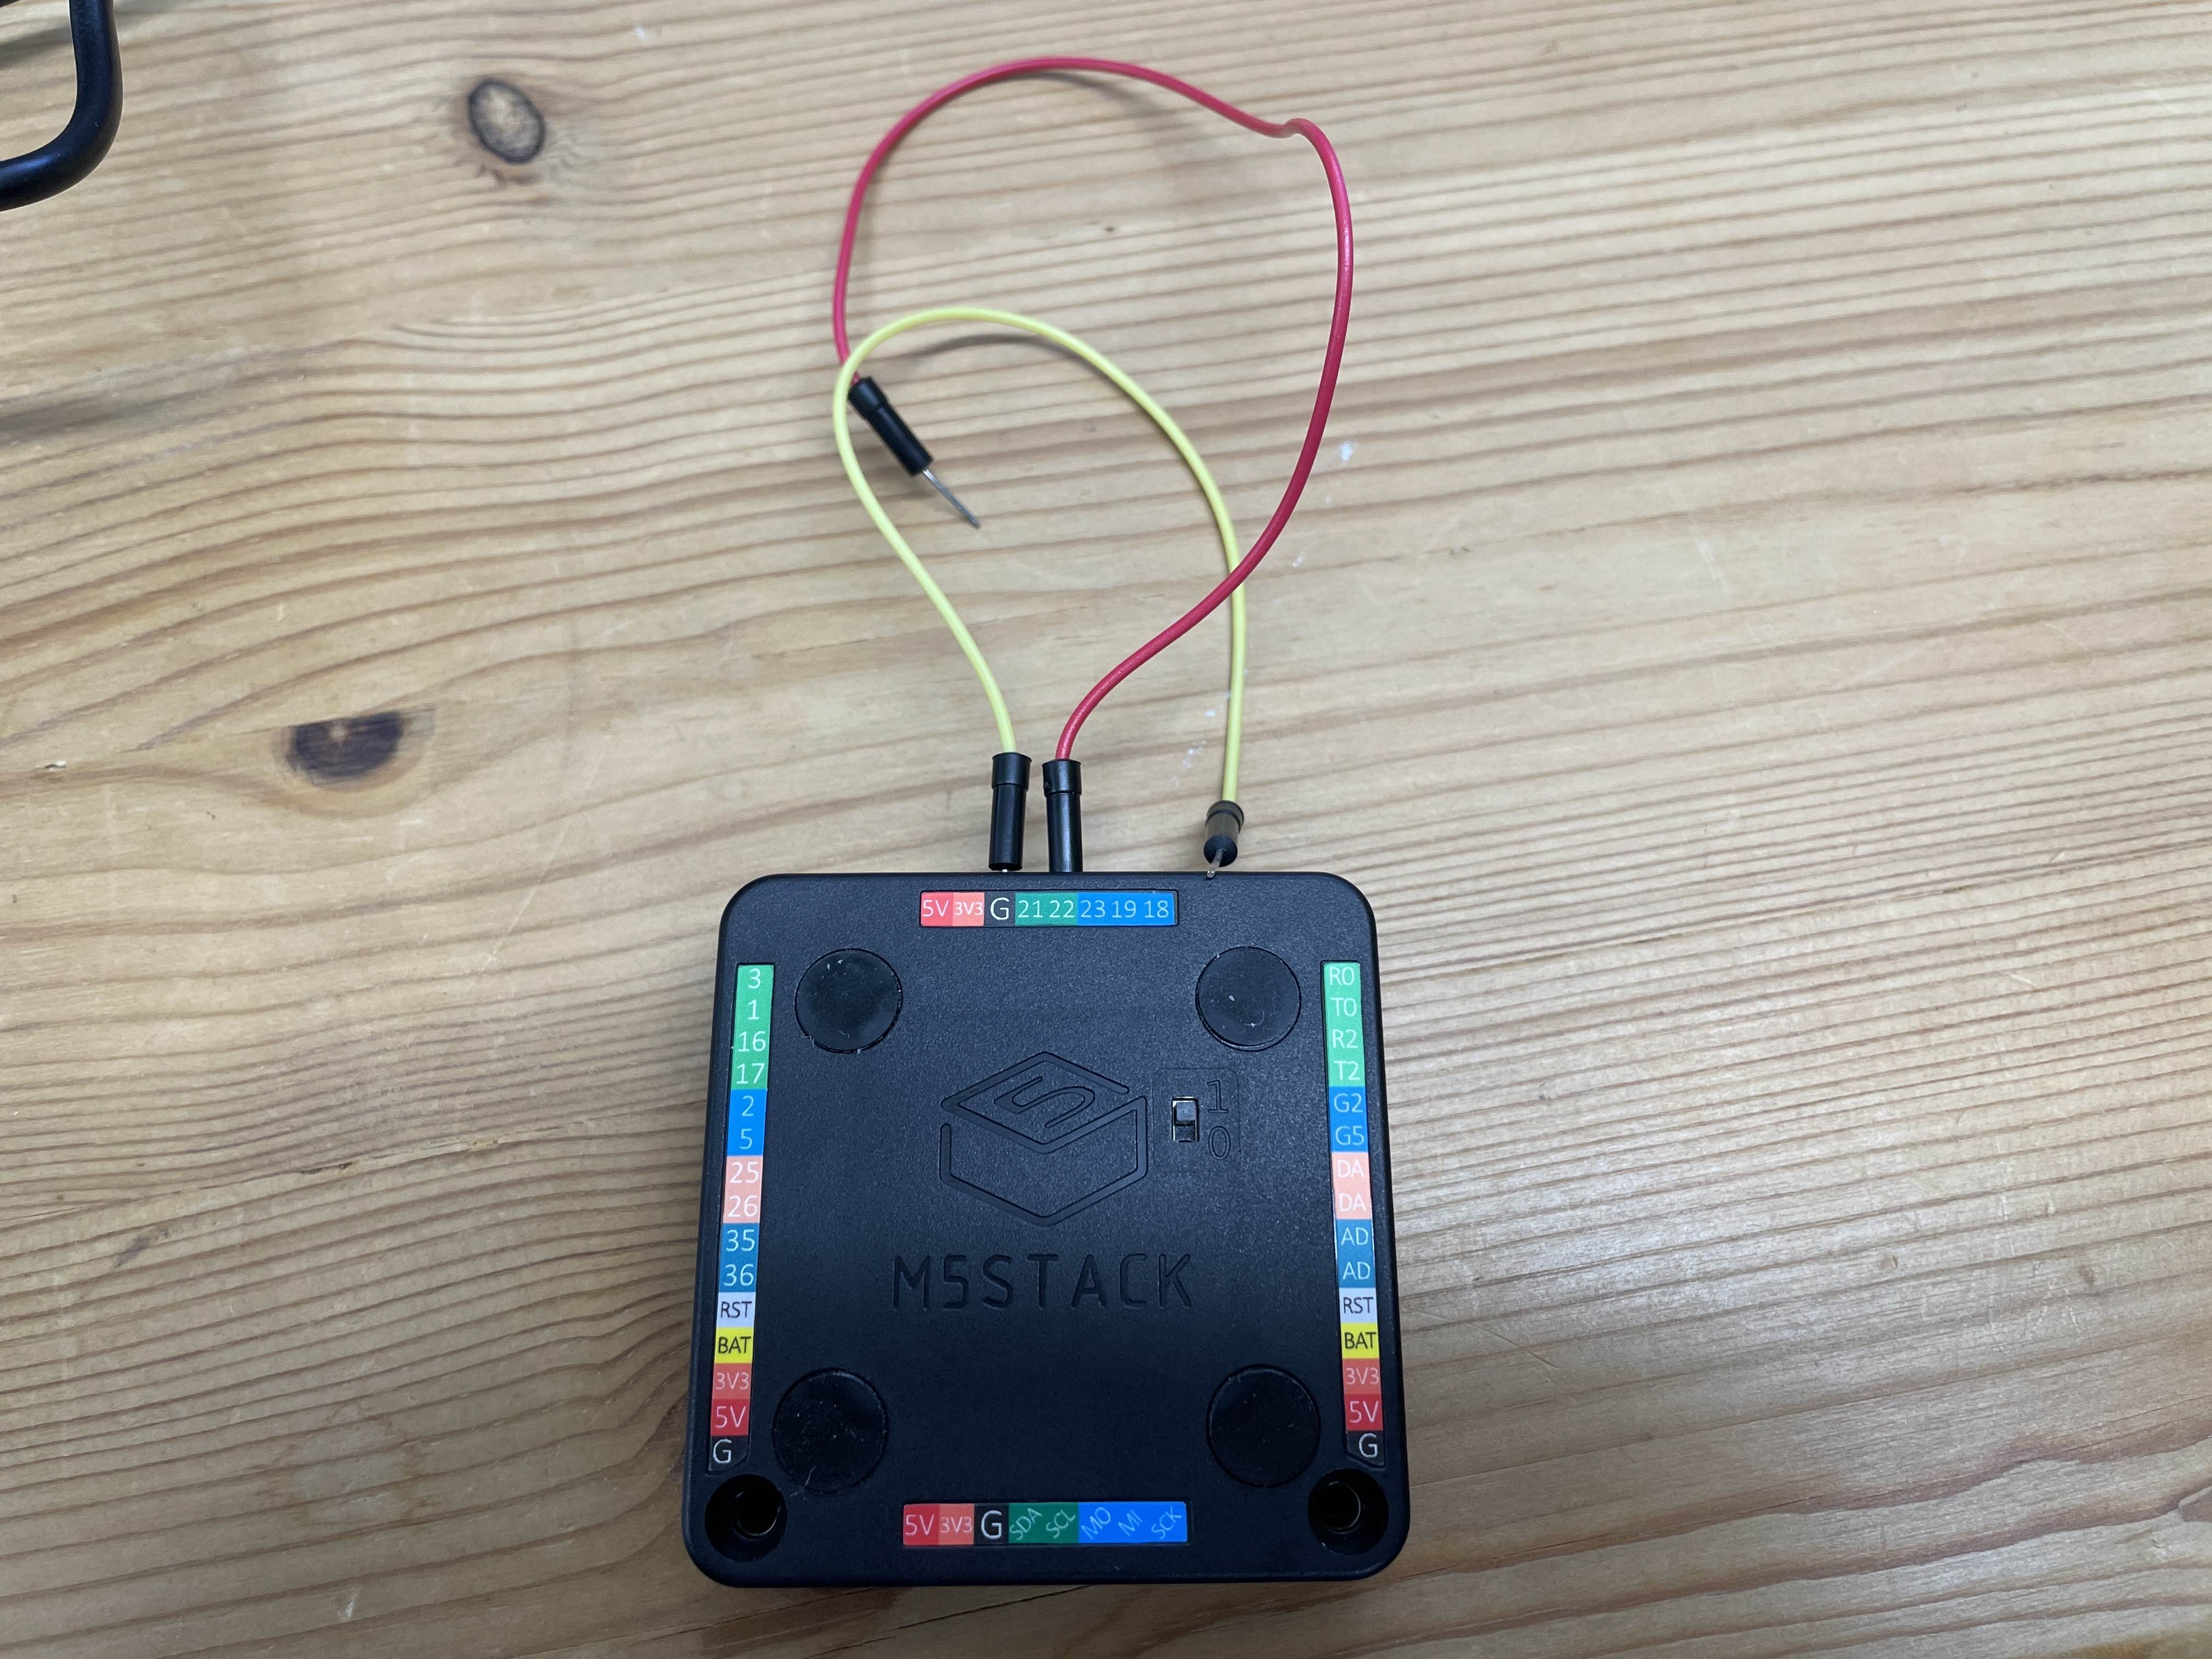
今回はデバイスがなかったため、直接線同士をつな今回はデバイスがなかったため、直接線同士を直接つないで確認します。
次に下記コードをコピーしてください。
#include <M5Stack.h> //M5core2の際
//#include <M5StackS3.h> //M5coreS3の際
int previousValue = -1; // 前回のデジタル値を保持する変数(初期値は未設定状態)
void setup() {
M5.begin();
M5.Power.begin();
M5.Lcd.setTextSize(2);
}
void loop() {
//M5.Lcd.printf("Read value:%d\n", digitalRead(22));
int digitalValue = digitalRead(22);
// 値が変化した場合のみ表示を更新
if (digitalValue != previousValue) {
previousValue = digitalValue; // 前回の値を更新
M5.Lcd.setCursor(120, 40); // 表示位置(X=120, Y=40)
M5.Lcd.printf("%d ", digitalValue); // 値を上書き表示し、余分な文字を消去
}
M5.update();
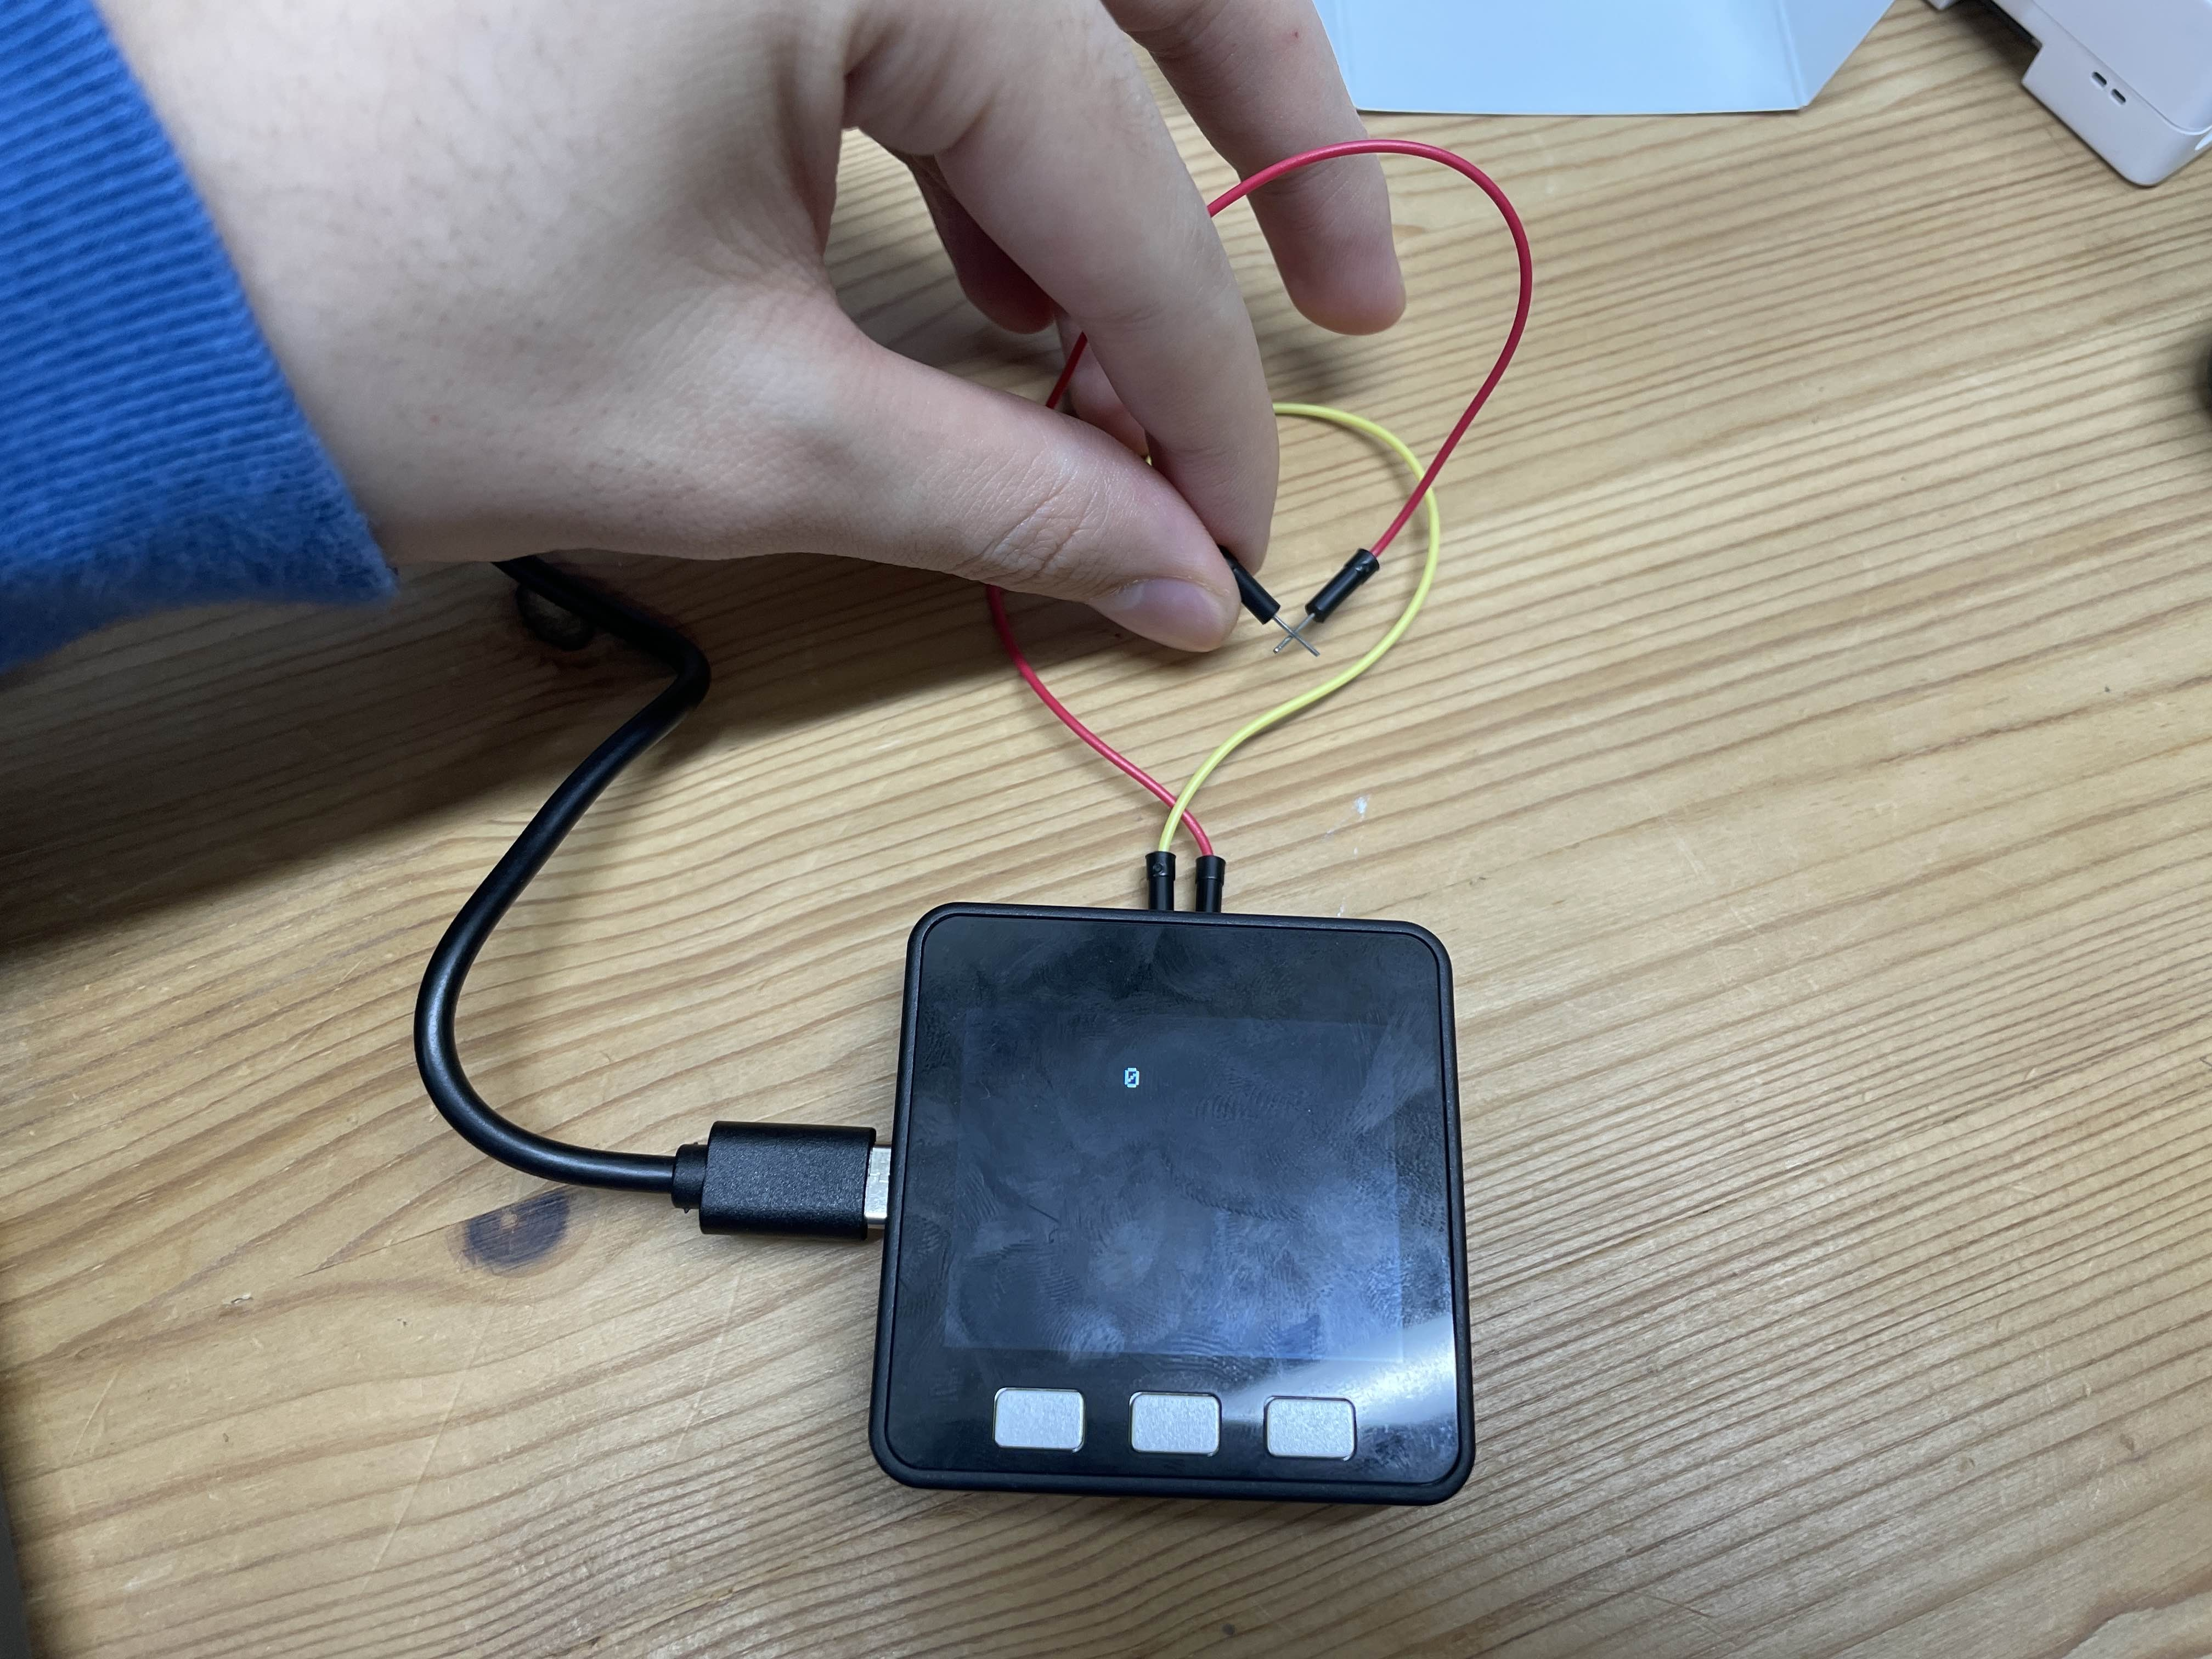
}こちらは、ON/OFFのとてもシンプルなものになっており、線がくっつくと0が、離れると1が表示されます。こちらを流し込んで確認します。
線が繋がっていないと1が出ます

繋げると0が出ます
M5Stackの設定(合わせる)
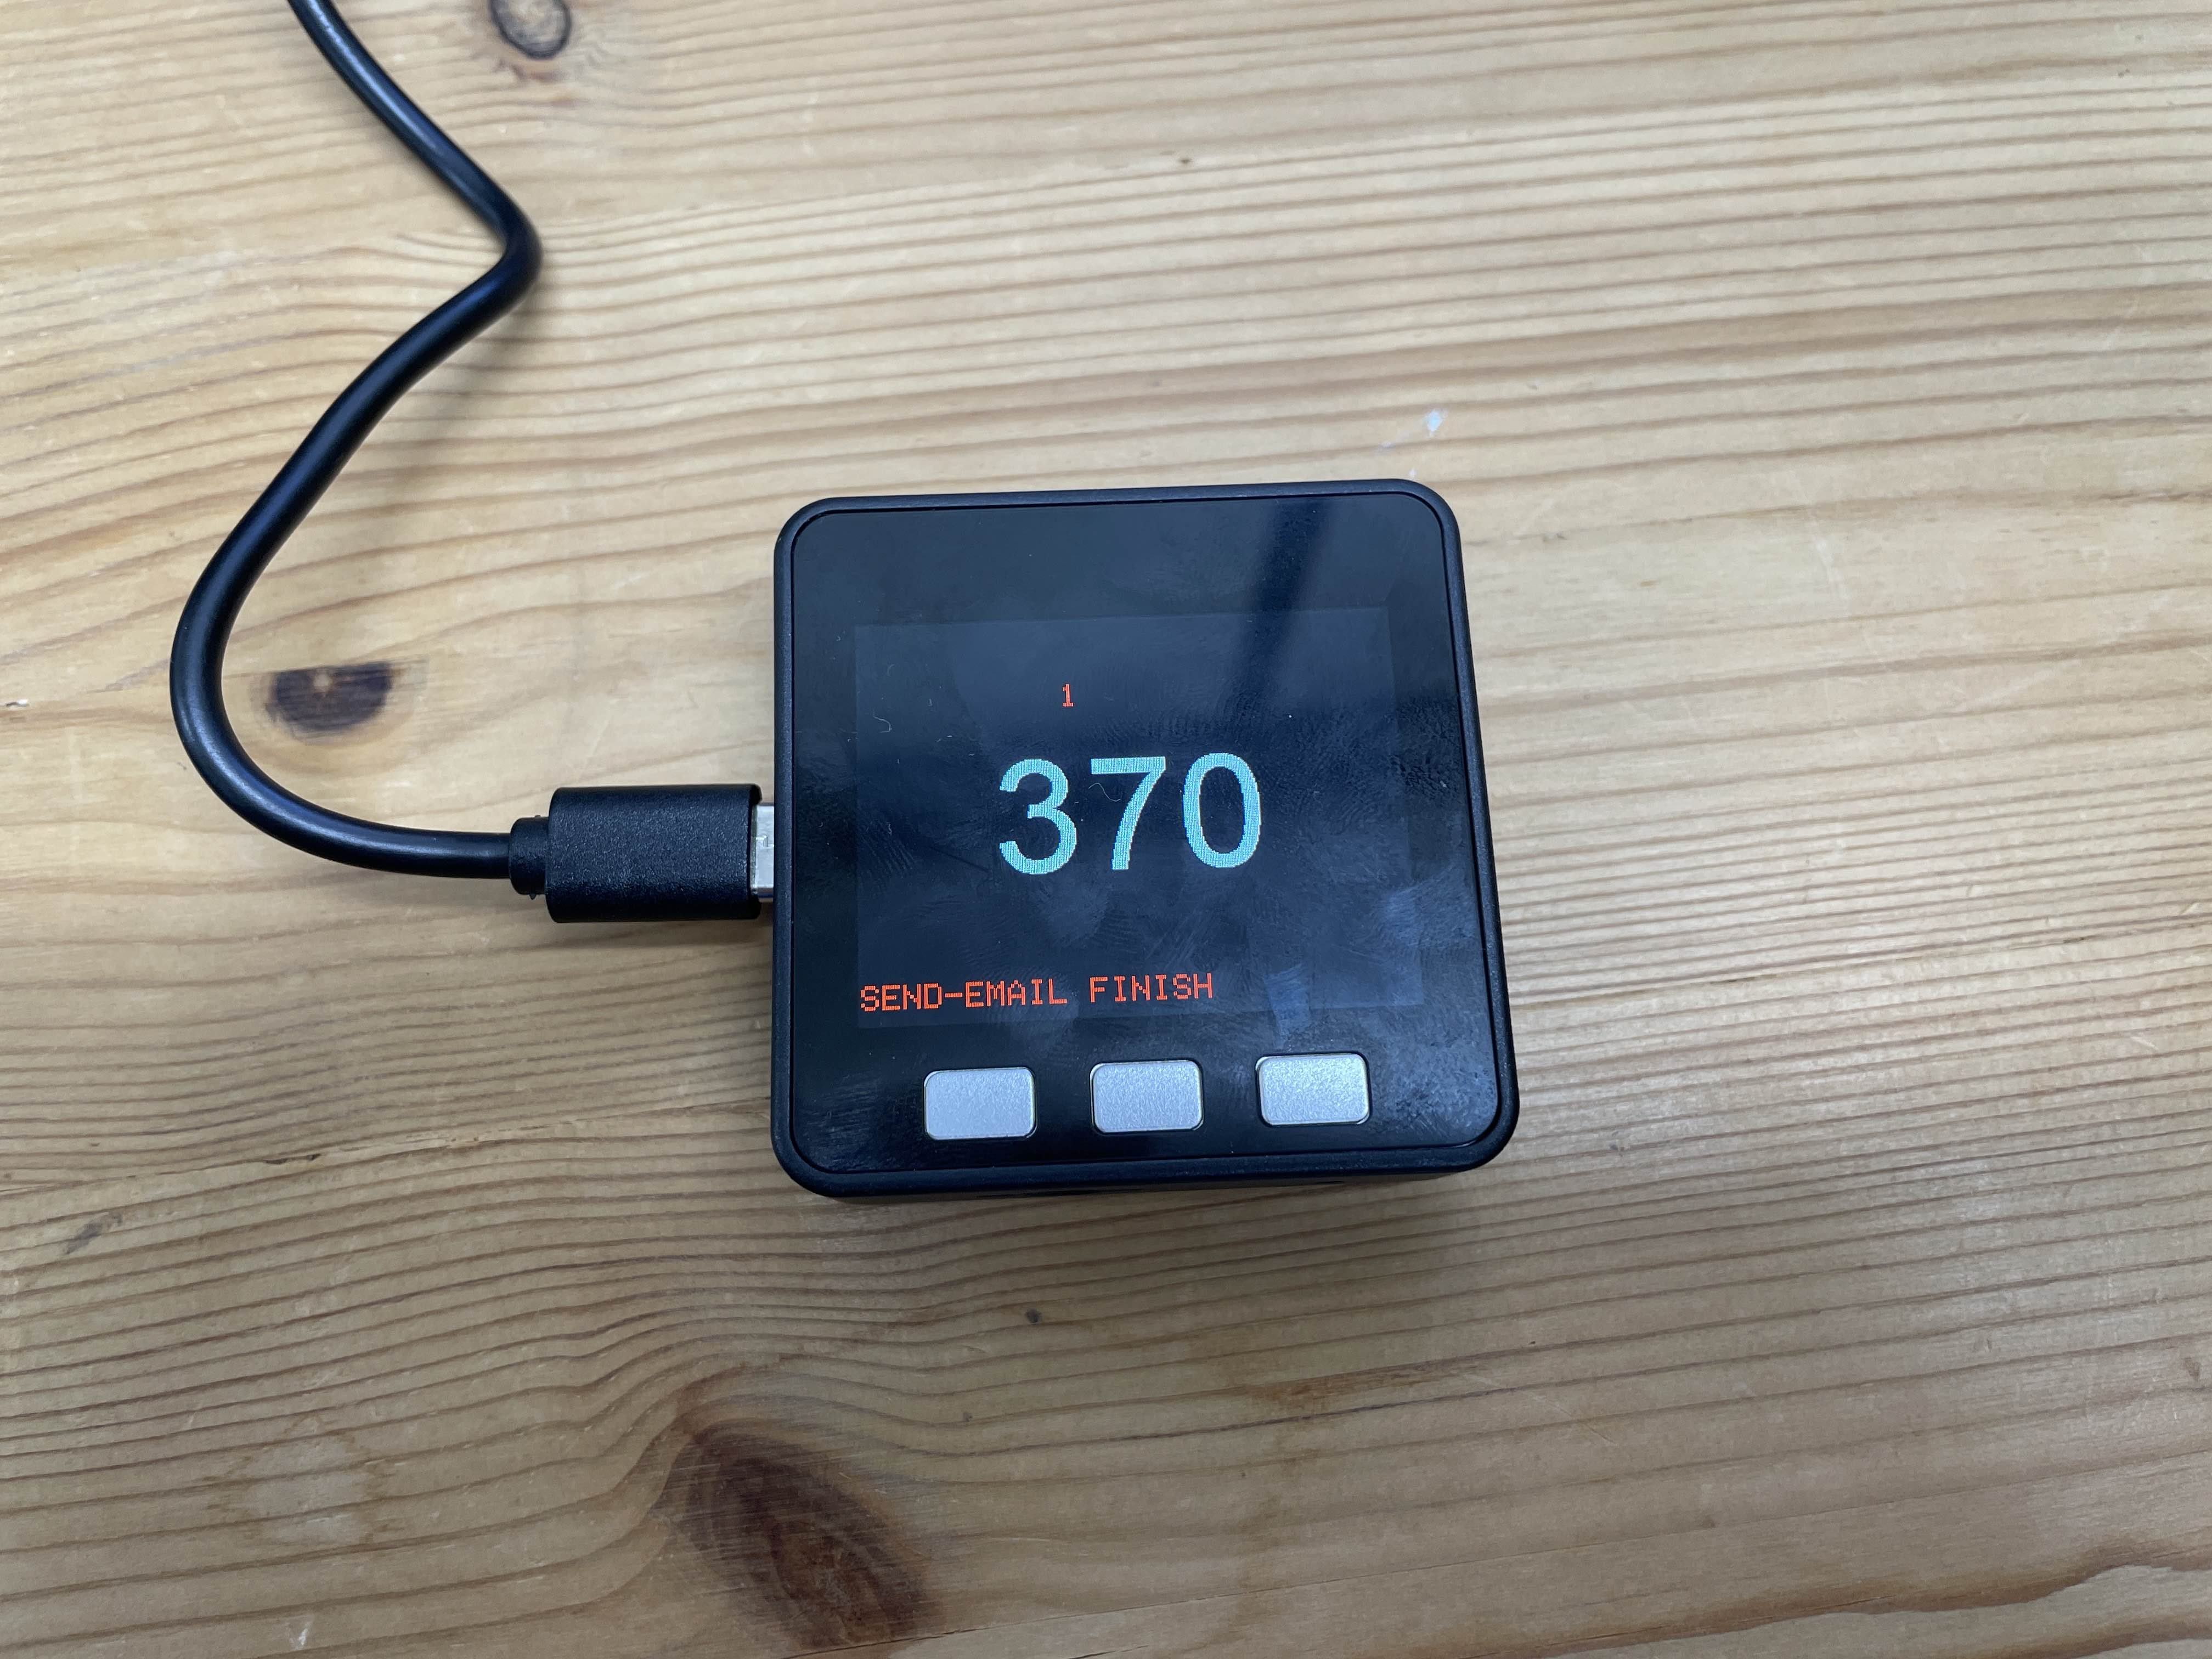
最後にこの2つを組み合わせます。
やることは、「線がくっついた際にメールを送る」という動作のため、変更点は
if(digitalValue == 0)を追加するだけになります。
下記のコードをコピーしてください。
#include <M5Stack.h>  //M5core2の際
//#include <M5Stack.h>  //M5coreS3の際
#include <EMailSender.h>
#include <WiFi.h>

int previousValue = -1; // 前回のデジタル値を保持する変数(初期値は未設定状態)

char ssid[100]       = "Wi-Fi SSID";
char password[100]   = "Wi-Fi password";
char myMailAdr[100]  = "送る側のメールアドレス";
char myMailPass[100] = "使用するメールサーバーのトークン";
char toMailAdr[100]  = "受け取るメールアドレス";

EMailSender emailSend(myMailAdr, myMailPass);

unsigned long displayTime = 0;

boolean send_mail(String msg) {
  EMailSender::EMailMessage message;
  message.subject = "IoTデバイスからの通知";
  message.message = msg;
  EMailSender::Response resp = emailSend.send(toMailAdr, message);
  return resp.status;
}

void setup() {
M5.Power.begin();

  M5.begin();
  M5.Lcd.setTextSize(2);
  M5.Lcd.fillScreen(BLACK);

  M5.Lcd.printf("WIFI START:%s ", ssid);
  WiFi.begin(ssid, password);
  while (WiFi.status() != WL_CONNECTED) {
    delay(500);
    M5.Lcd.print(".");
  }
  M5.Lcd.println(" - READY");
}

void loop() {
   int digitalValue = digitalRead(22);

    if (digitalValue != previousValue) {
        previousValue = digitalValue;  // 前回の値を更新
        M5.Lcd.setCursor(0, 20);     // 表示位置(X=120, Y=40)
        M5.Lcd.printf("%d  ", digitalValue); // 値を上書き表示し、余分な文字を消去
    }

 if(digitalValue==0) {
    int val0 = random(100, 1000);
    M5.Lcd.fillScreen(BLACK);
    M5.Lcd.setTextSize(1); // size
    M5.Lcd.setTextColor(WHITE); // color
    M5.Lcd.setTextDatum(4); // origin
    M5.Lcd.drawNumber(val0, 160, 120, 8); // value, x, y, font
    String msg = "乱数の値は " + String(val0) + " です。";
    send_mail(msg);
    M5.Lcd.setTextSize(2); // size
    M5.Lcd.setTextColor(RED); // color
    M5.Lcd.setCursor(0, 220); // x, y
    M5.Lcd.print("SEND-EMAIL FINISH");
    displayTime = millis();
  }

  /*if(M5.BtnA.wasPressed()) {
    int val0 = random(100, 1000);
    M5.Lcd.fillScreen(BLACK);
    M5.Lcd.setTextSize(1); // size
    M5.Lcd.setTextColor(WHITE); // color
    M5.Lcd.setTextDatum(4); // origin
    M5.Lcd.drawNumber(val0, 160, 120, 8); // value, x, y, font
    String msg = "乱数の値は " + String(val0) + " です。";
    send_mail(msg);
    M5.Lcd.setTextSize(2); // size
    M5.Lcd.setTextColor(RED); // color
    M5.Lcd.setCursor(0, 220); // x, y
    M5.Lcd.print("SEND-EMAIL FINISH");
    displayTime = millis();
  }*/
  if(millis() - displayTime >= 2000) {
    M5.Lcd.fillScreen(BLACK);
  }
  M5.update();
}


こちらで書き込み、線を繋ぐと数字が出てきます。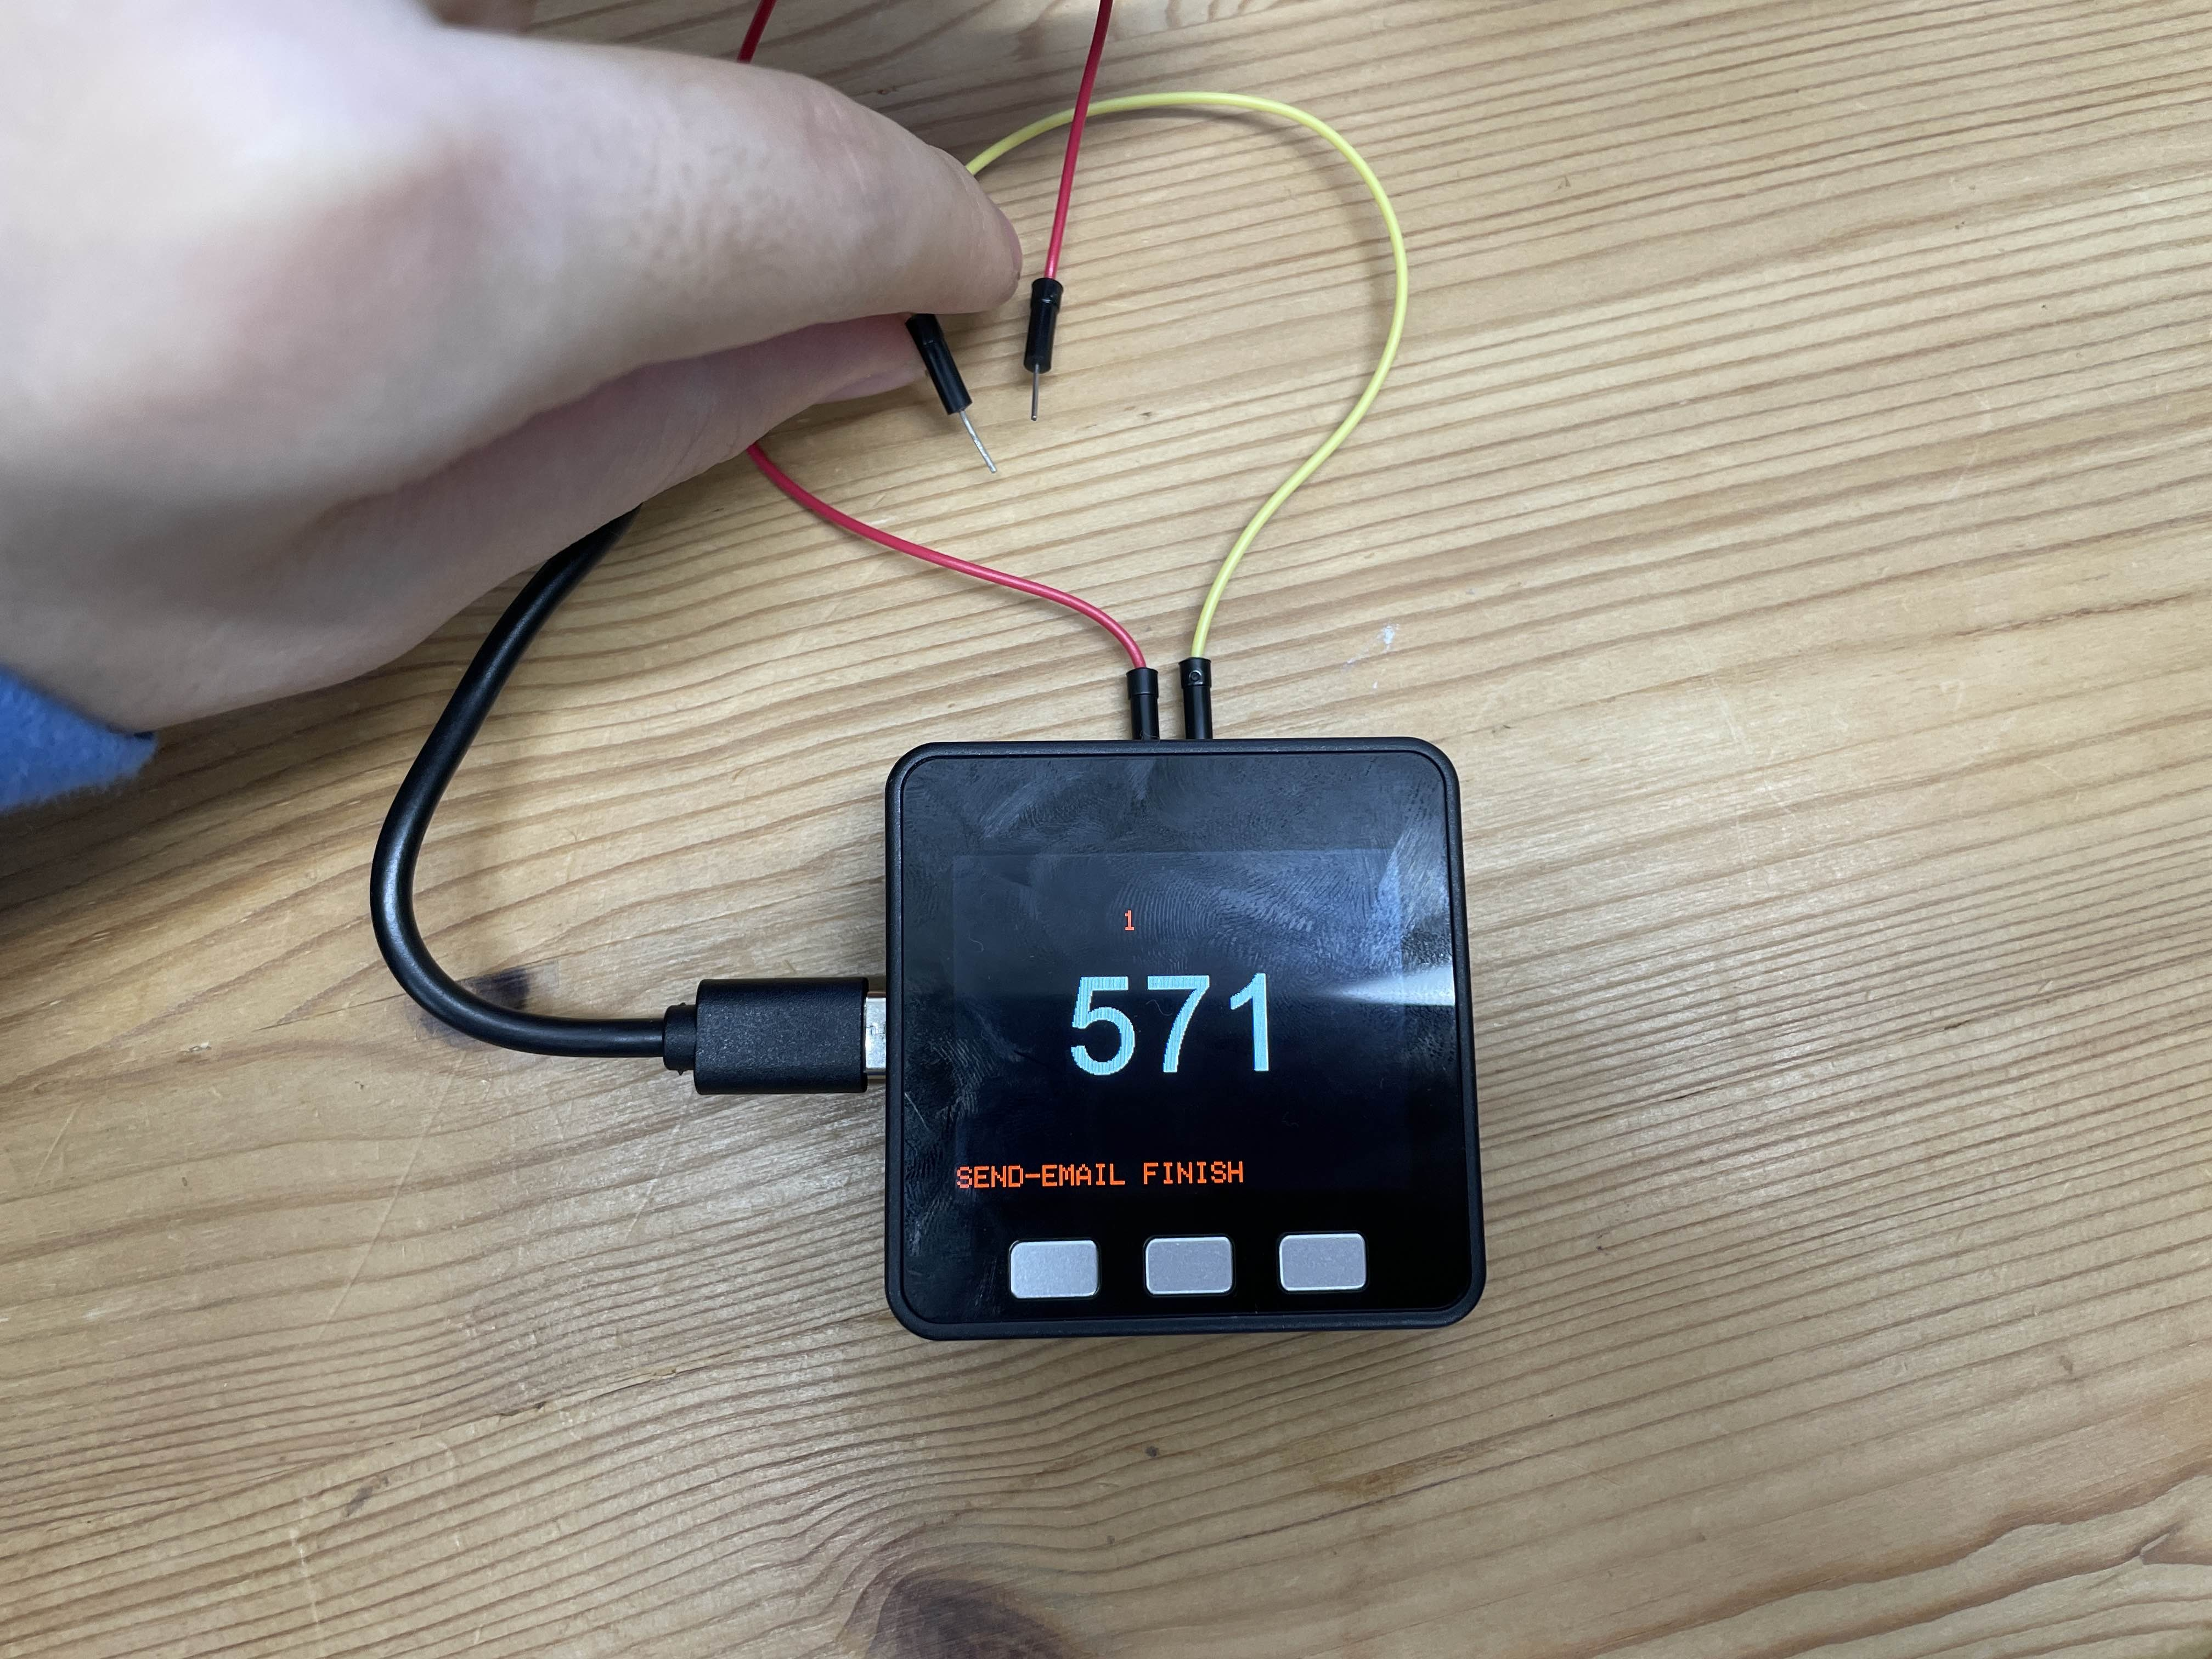
数字が出てきたらメールを確認し、送られてきていれば完成になります。