今回は、前回作ったリアルタイム顔認識に、実際どの部分を認識して顔を識別しているかを番号を振って確認してみました。
リアルタイム顔認識アプリは、下記URLを参考に作成してみてください。
ランドマーク番号の確認
顔の識別番号のことを、よくランドマークといいます。このランドマークは、使うプログラムですでに振り分けられており、決まった番号が決まった場所を認識しています。
ただ、前回作ったプログラムではランドマーク番号が出てきませんので、今回ランドマークを確認するプログラムを書きました。
import cv2
import mediapipe as mp
import time

# 目のランドマークインデックス
left_indices = [33, 133, 160, 159, 158, 157, 173, 246]
right_indices = [362, 263, 387, 386, 385, 384, 398, 466]
eye_indices = left_indices + right_indices

# MediaPipe 初期化
mp_face_mesh = mp.solutions.face_mesh
face_mesh = mp_face_mesh.FaceMesh(
    static_image_mode=False,
    max_num_faces=1,
    refine_landmarks=True,
    min_detection_confidence=0.5,
    min_tracking_confidence=0.5
)
mp_drawing = mp.solutions.drawing_utils
mp_drawing_styles = mp.solutions.drawing_styles

cap = cv2.VideoCapture(0)

while cap.isOpened():
    success, image = cap.read()
    if not success:
        print("Ignoring empty camera frame.")
        continue

    image.flags.writeable = False
    image_rgb = cv2.cvtColor(image, cv2.COLOR_BGR2RGB)
    results = face_mesh.process(image_rgb)

    image.flags.writeable = True
    image = cv2.cvtColor(image_rgb, cv2.COLOR_RGB2BGR)

    if results.multi_face_landmarks:
        for face_landmarks in results.multi_face_landmarks:
            h, w, _ = image.shape

            # 目のインデックスのみ番号描画
            for idx in eye_indices:
                lm = face_landmarks.landmark[idx]
                x, y = int(lm.x * w), int(lm.y * h)
                cv2.putText(image, str(idx), (x, y), cv2.FONT_HERSHEY_SIMPLEX,
                            0.4, (0, 255, 0), 1, cv2.LINE_AA)

            # メッシュ描画(オプション)
            mp_drawing.draw_landmarks(
                image=image,
                landmark_list=face_landmarks,
                connections=mp_face_mesh.FACEMESH_TESSELATION,
                landmark_drawing_spec=None,
                connection_drawing_spec=mp_drawing_styles.get_default_face_mesh_tesselation_style()
            )

    cv2.imshow('MediaPipe Eye Index View', image)
    if cv2.waitKey(5) & 0xFF == 27:
        break

cap.release()
cv2.destroyAllWindows()
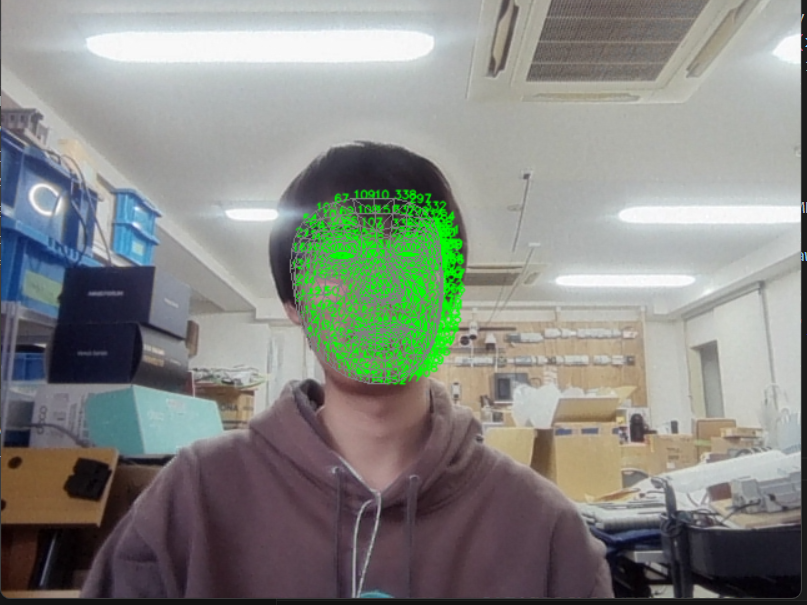
こちらのソースコードを実行すると、下図のようにリアルタイムで番号が振られます。
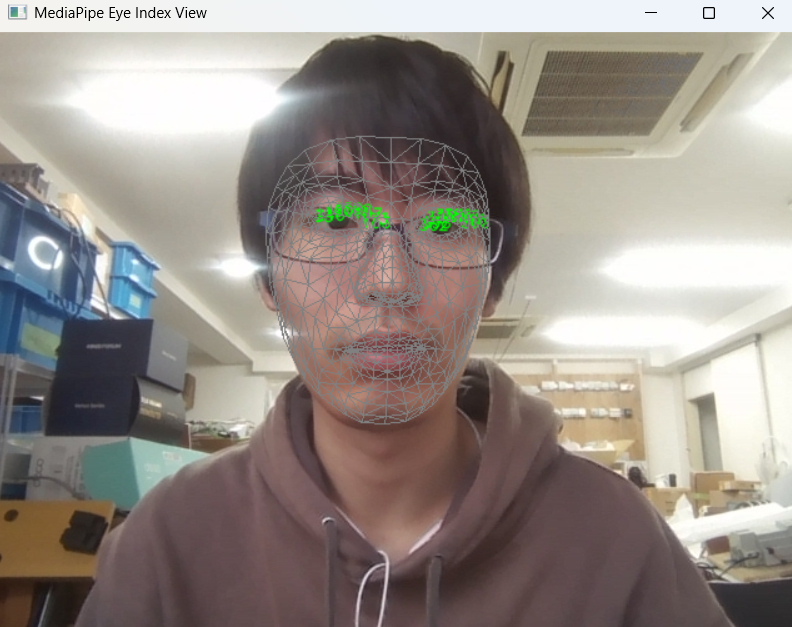
緑の部分が数値になるのですが、図ではつぶれてしまい見えませんので、ご自身で実行し近づいて確認してみてください。
この番号は、プログラムの下記の部分で表記を指定しています。
# 目のランドマークインデックス
left_indices = [33, 133, 160, 159, 158, 157, 173, 246]
right_indices = [362, 263, 387, 386, 385, 384, 398, 466]
eye_indices = left_indices + right_indices
こちらの番号を変えると表記場所も変わります。
試しに33を1にしてみます。すると、目の周りに表記が集まっていましたが、1つだけ鼻先に「1」と表記がされるようになります。
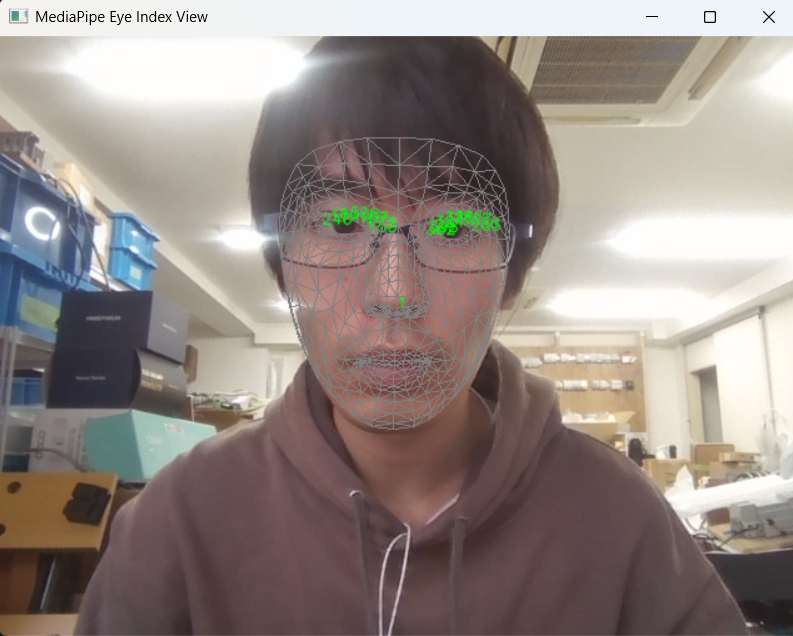
この「1」は見やすいかもしれません。
ランドマークの座標取得
座標を取得するには下記のソースを使います。
import cv2
import mediapipe as mp
import time

# 目のランドマークインデックス(左右8点ずつ)
left_eye_indices = [33, 133, 160, 159, 158, 157, 173, 246]
right_eye_indices = [362, 263, 387, 386, 385, 384, 398, 466]
eye_indices = left_eye_indices + right_eye_indices

# MediaPipe 初期化
mp_face_mesh = mp.solutions.face_mesh
face_mesh = mp_face_mesh.FaceMesh(
    static_image_mode=False,
    max_num_faces=1,
    refine_landmarks=True,
    min_detection_confidence=0.5,
    min_tracking_confidence=0.5
)
mp_drawing = mp.solutions.drawing_utils
mp_drawing_styles = mp.solutions.drawing_styles

# タイマー初期化
last_logged_time = time.time()

cap = cv2.VideoCapture(0)

while cap.isOpened():
    success, image = cap.read()
    if not success:
        print("Ignoring empty camera frame.")
        continue

    image.flags.writeable = False
    image_rgb = cv2.cvtColor(image, cv2.COLOR_BGR2RGB)
    results = face_mesh.process(image_rgb)

    image.flags.writeable = True
    image = cv2.cvtColor(image_rgb, cv2.COLOR_RGB2BGR)

    current_time = time.time()

    if results.multi_face_landmarks:
        for face_landmarks in results.multi_face_landmarks:
            h, w, _ = image.shape

            # 10秒経過していたら出力
            if current_time - last_logged_time >= 10:
                print(f"\n--- Eye Landmarks at {int(current_time)}s ---")
                for idx in eye_indices:
                    lm = face_landmarks.landmark[idx]
                    x, y, z = int(lm.x * w), int(lm.y * h), lm.z
                    print(f"Eye Point {idx}: (x={x}, y={y}, z={z})")
                last_logged_time = current_time

            # メッシュ描画
            mp_drawing.draw_landmarks(
                image=image,
                landmark_list=face_landmarks,
                connections=mp_face_mesh.FACEMESH_TESSELATION,
                landmark_drawing_spec=None,
                connection_drawing_spec=mp_drawing_styles.get_default_face_mesh_tesselation_style()
            )

    cv2.imshow('MediaPipe FaceMesh', image)
    if cv2.waitKey(5) & 0xFF == 27:
        break

cap.release()
cv2.destroyAllWindows()
こちらのソースを実行すると、10秒に1回座標データがPythonのterminalに表示されます。

ランドマークは全部で約468個あります。そのため、今回は目の上の輪郭のみを取得し座標として出しています。
下記の部分を増やしたり、番号を変えることで取得する座標なども変わってきます。
# 目のランドマークインデックス(左右8点ずつ)
left_eye_indices = [33, 133, 160, 159, 158, 157, 173, 246]
right_eye_indices = [362, 263, 387, 386, 385, 384, 398, 466]
eye_indices = left_eye_indices + right_eye_indices